This mega rich chocolate cake was requested by Shirsten, a lovely friend and ex-colleague, for her wedding. I based it on my Chocolate and Mascarpone Cream Cake.
Making a wedding cake is always a pleasure and a privilege, but also quite a responsibility. This one, made over several hot August days, gave me several “challenges” that I’ll tell you about later. First, the normal stuff: ingredients, method etcetera.
Makes: A cake large enough to serve big slices to 12 – 15 guests at a small wedding
Time: It took me the best part of two days. I wasn’t baking and caking the whole time, but neither was I free to do a lot else.
Level: Reasonably easy, provided you avoid the mistakes that I made and will tell you about.
Need: 3 x 20cm/8” round, loose bottomed cake tins. A stand mixer is not essential, but if you have one, use it. Space in your fridge is absolutely essential. A cake turntable is very useful too. Other useful items are a small crank handled spatula and a cake lifter.

Cake Ingredients
- 275g unsalted butter
- 325g plain flour
- 75g cocoa powder
- 3 tsp baking powder
- ½ tsp fine salt
- 2 tsp coffee powder or granules (optional)
- 5 medium eggs
- 1- 2 tsp vanilla extract
- 225g light brown sugar
- 225g golden caster sugar
- 300ml buttermilk
Filling*
- 600g mascarpone
- 125g icing sugar, sieved
- 2 tsp vanilla extract
Topping*
- 150ml double cream
- 2 tbsp golden caster sugar
- 150g dark chocolate, chopped
- Various chocolates or other decorations of choice + gold spray or similar (if using)
*These amounts should give you more than enough filling & topping
Preparation
- Weigh and soften the butter
- Sift together the flour, cocoa powder, baking powder, salt & coffee
- Grease and line the base and sides of the cake tins, dust very lightly with a little of the flour mixture
- Lightly beat the eggs in a small bowl and add in the vanilla extract
- Pre-heat the oven to fan 160°C
Method
1. Put the softened butter and both sugars into a large bowl and beat together vigorously until the mixture is light and fluffy.
2. Gradually add the eggs & vanilla mixture + 1 tsp of the flour mixture each time, beating well between each addition.
3. Add a third of the flour mixture and a third of the buttermilk, gently combining them with a large metal spoon. Repeat twice. Take care to scrape down the side of the bowl really well.
4. Spoon the mixture equally between the prepared tins. (Weigh for accuracy)
5. Bake for 30 – 35 minutes – until the side of the cakes begin to pull away from the tin or when a skewer comes out clean.
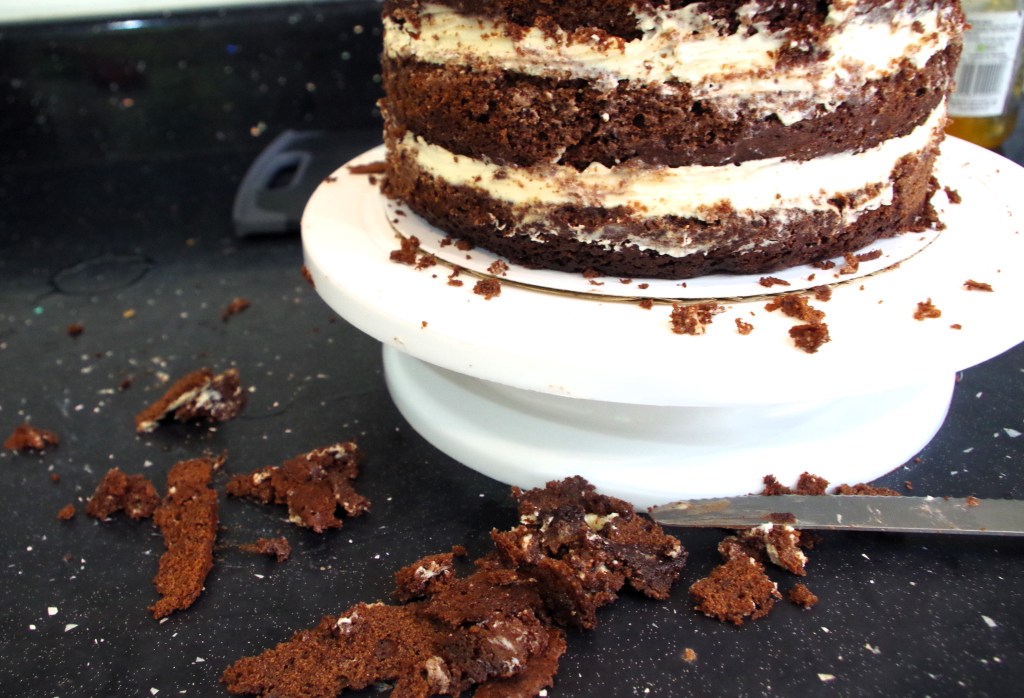
6. Cool in the tins for 5 – 10 minutes then turn out onto a wire rack to cool fully. Your cakes may be a little dry or crumbly; if so, brush on a glaze using slightly diluted and warmed apricot jam. Or do this after assembling the three cakes.
7. To make the filling, put the mascarpone in a large bowl and beat vigorously; add the vanilla extract and beat some more – until it’s light and creamy. Sift in the icing sugar and stir until incorporated then beat a little more. Take care not to overbeat at this stage or it may split.
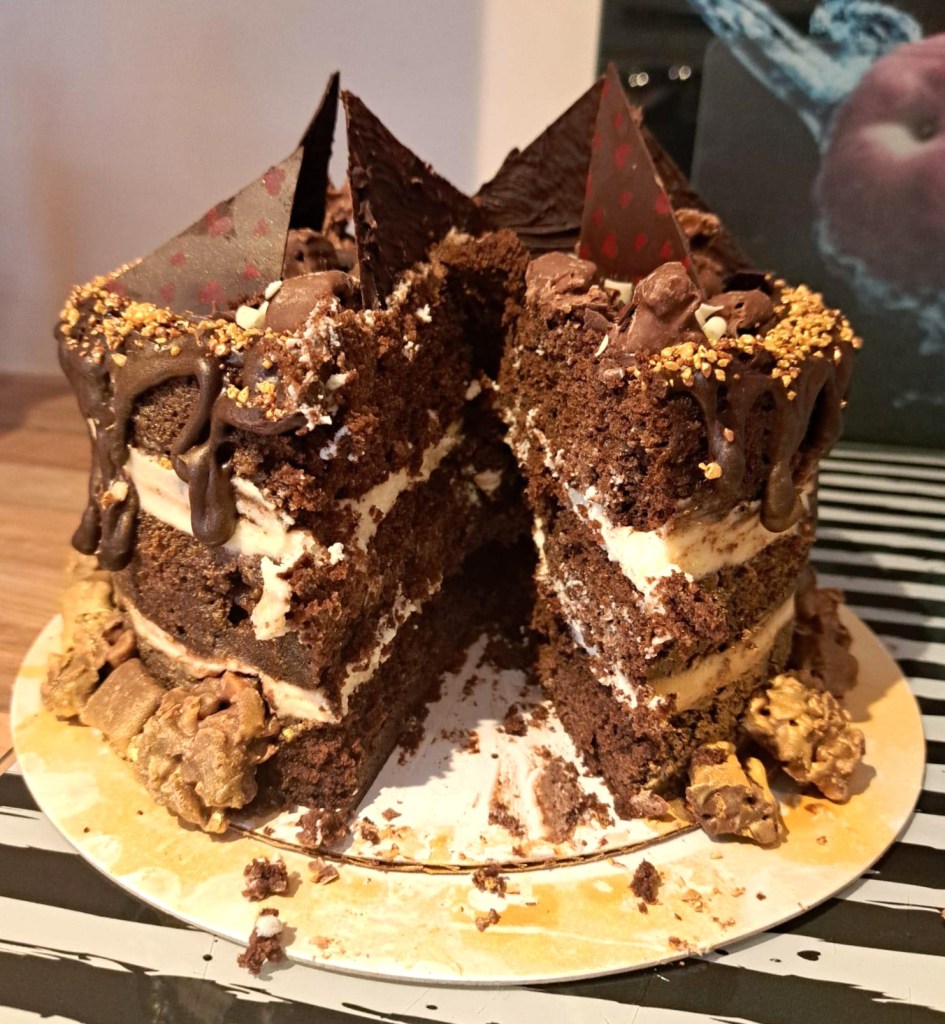
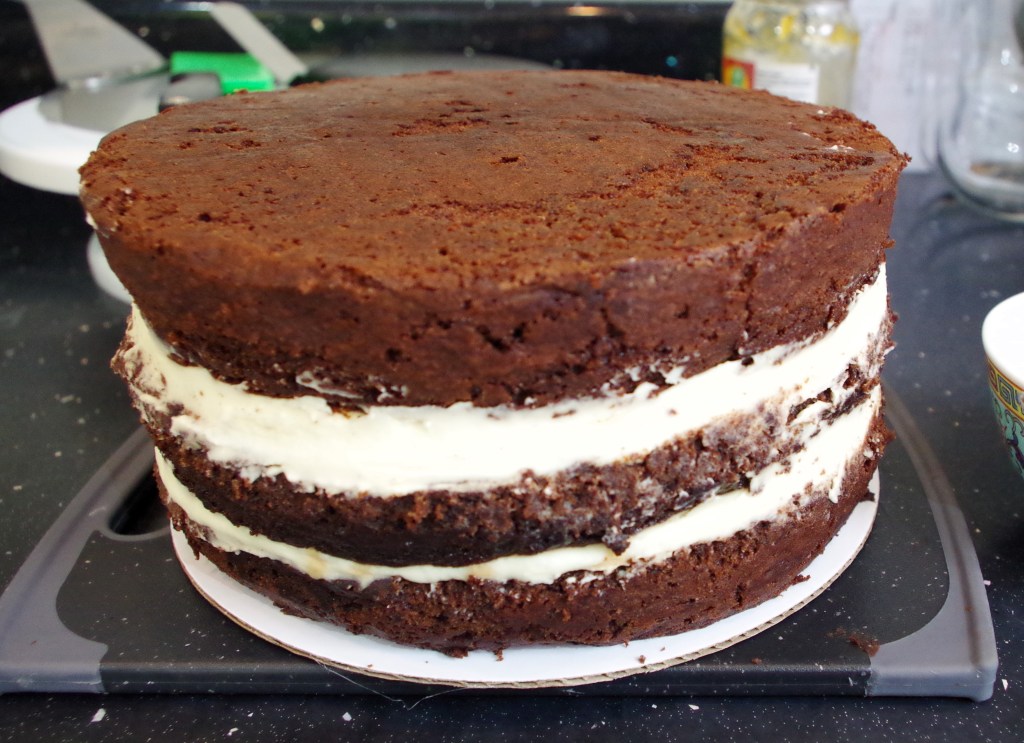
8. Assemble the cakes in layers using the filling between each layer. Use a spatula to apply it, or a piping bag with a large plain nozzle. Place the cake in the fridge for at least 30 minutes.
9. Make the chocolate ganache by gently warming the cream and sugar in a saucepan then add the chocolate pieces. Stir until melted, well combined and smooth. Leave to cool and thicken a little. (It needs to run down the sides of the cake without clogging)
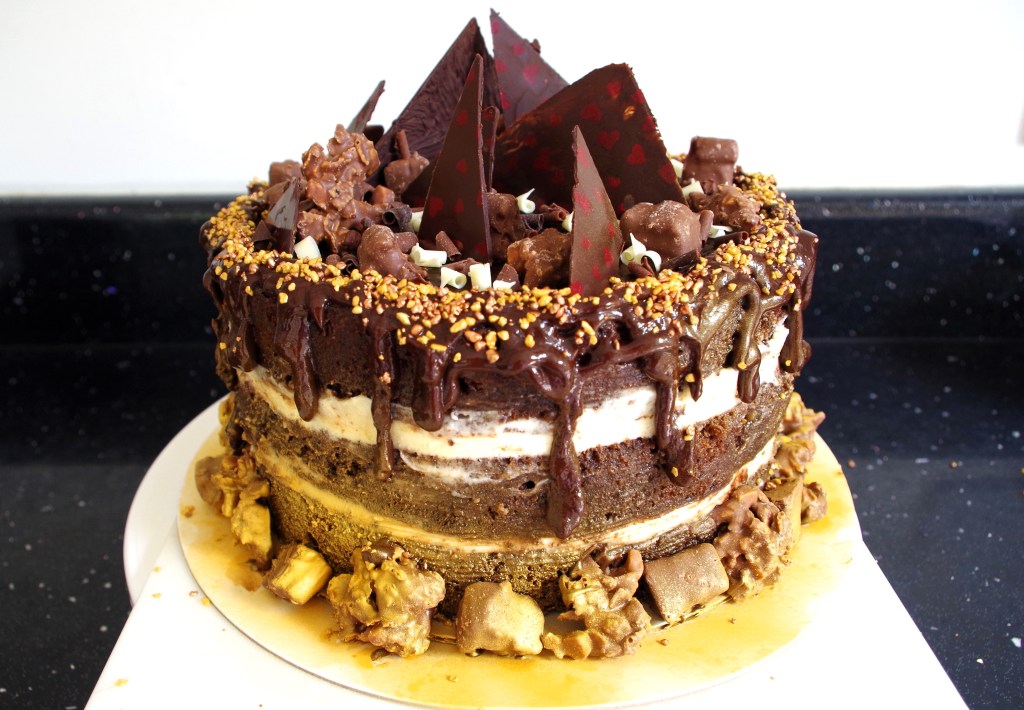
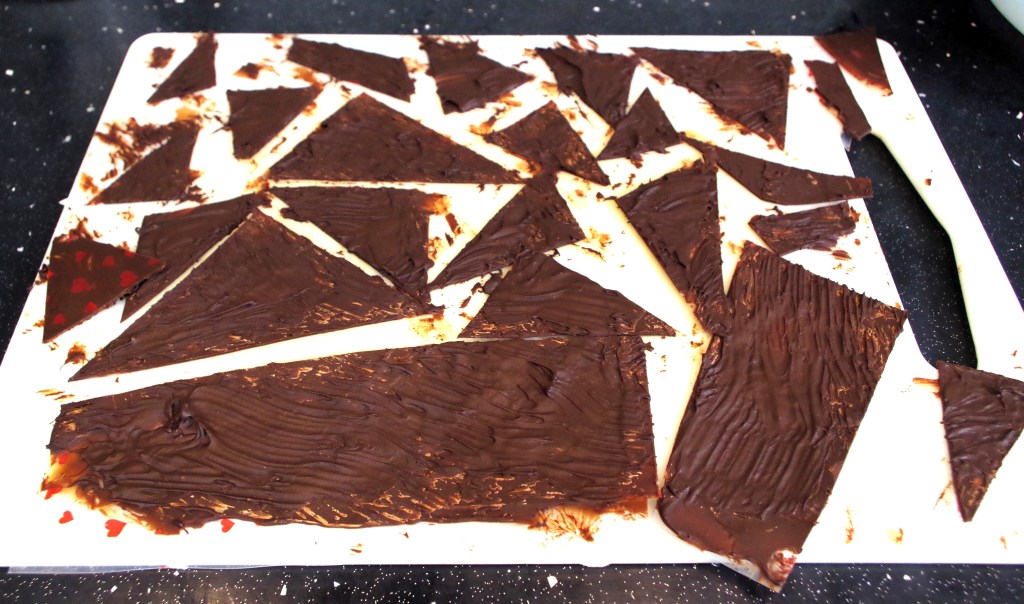
10. Meanwhile arrange any chosen decorations on top, but leave space round the edge for your ganache. Your decorations may sit on the cake firmly if you’ve used an apricot glaze. If not, use a dab of ganache where needed.
11. Drizzle the ganache over the edges of the cake, allowing it to run down the sides here and there. Arrange further decorations on top if required. (Another option would be to completely cover the top of the cake with the ganache and then add any decorations.) If you choose to use a gold or other spray, do it lightly while rotating the cake on a cake turntable.


OK, now for what actually Happened
1, 2 & 3 – No problem. All straight forward
4. There was a minor issue weighing three filled cake tins. The loose bottomed tins were too big for my kitchen scale. Simple solution – I put a small chopping board on the scale then the tins on top.
5. Bake for 30 – 35 minutes. No problem, but even in a fan oven it may be necessary to give a few extra minutes to any tins on a lower shelf.
6. Cool in the tins for 5 – 10 minutes then turn out onto a wire rack to cool fully. This shouldn’t have been a problem, but being a bit clumsy (or careless or old and doddery) I put one cake on the edge of the rack and it broke (the cake, not the rack. My cakes aren’t that heavy). I solved this by using that cake as the middle layer of three. Another option would have been to “glue” the crack using melted chocolate, but that wasn’t necessary.
7. Making the mascarpone filling gave me a bigger problem (sorry, I mean “challenge”). Usually I add melted white chocolate to mascarpone or butter creams and whisk it by hand. It adds richness and thickens the mixture. Never before had it caused the mixture to curdle. This time it did. This meant a quick drive to the shops to buy more mascarpone. On the plus side I discovered that if I used my stand mixer, the mascarpone alone was thick enough for my purposes and tasted lovely without any white chocolate.
8. Assembling the cakes in layers sounds easy enough, but without the use of a spirit level (which I’ve never actually tried using) my cakes were far from level. If you intend covering the sides it’s not a problem. But it certainly looked hideous, didn’t it?

At this point fridge space is essential. Fortunately my wonderful wife offered to do our weekly food shopping later in the week so the fridge was available. Major problem avoided.
9. Making the ganache was no problem. (Avoiding eating it was quite difficult though.)
10. For the decorations on top I unashamedly use two bags of Cadbury’s chocolates. I also made a lucky discovery. I realised that I could hide the rather scruffy bottom edge of the cake by attaching chocolates there.

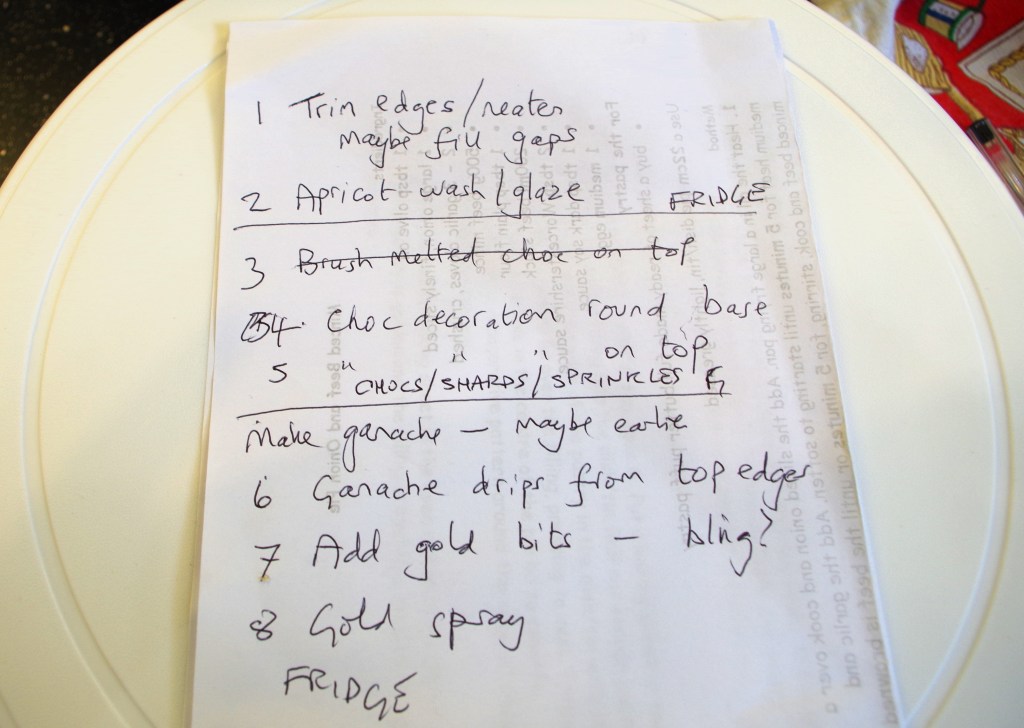

11. Drizzling the ganache was also quite simple. I considering using a piping bag, or spooning the ganache round the edges. Instead I used a refillable plastic bottle with a nozzle that I cut to size. It worked well, but filling the bottle was very messy, with chocolate going everywhere!.
Finally, transporting a large cake in a car needs two people: a driver and a holder. On hot days a cool box or cool bag is good, if you have one big enough. Otherwise a large cardboard box may have to do. Ice packs are also very helpful if the drive is more than a few minutes.
I hope you enjoyed reading the recipe and the story behind this cake. It shows that even an ugly duckling of a cake can be turned into a beautiful swan.
If you want more cake recipes click this link, or have a look at my site for lots of other great recipes, both sweet and savoury.
To make a comment or ask a question please go to the contact page. Click here for the home page.

